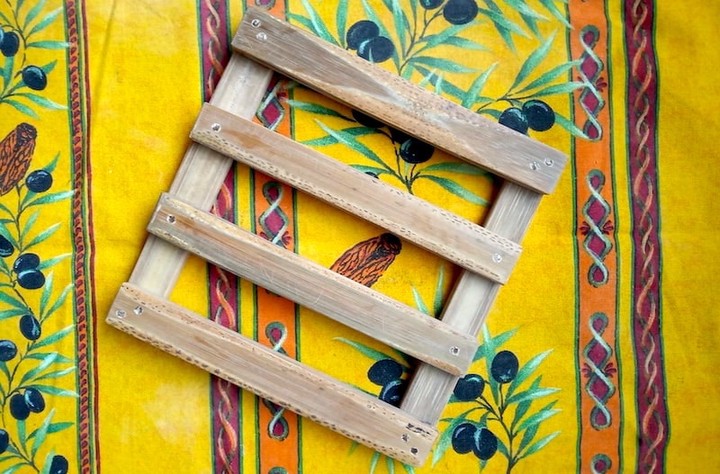
How to make a bamboo trivet for hot pots. Rustic style, easy technique
This heat insulation pad for hot pans is a good way to start with bamboo crafting. You can make it entirely with manual tools.
It does not contain nails nor glue, but only bamboo dowels that you can make yourself, and that give a rustic style to it!
- Level: easy (although making dowels may require a little bit of trial and error)
- Building time: a few hours to half a day (depending on your level of perfectionism!)
- Size: 14 × 14 cm (about 5.5 × 5.5 in)
This post is part of my bamboo craft project. If you are looking for something a little bit more complex, check out the tutorial for the bamboo underwear dryer.
Table of content
Material and tools needed
Building material
You need a bamboo pole of at least 14 cm long (about 5.5 in), 7-8 cm of diameter (3 in), and 0.8 cm thick (0.3 in). Such thickness is likely to be found at the base of the pole, as you can see from our bamboo wall thickness measurements. If you don’t have access to such a pole, no worries, you may have to slightly adapt the steps and you will just obtain a different trivet!
You can use a fresh or dry bamboo pole. I already tried, and both are fine. It can be easier to work with fresh bamboo, as it is tender and more flexible, but there is a risk that some cracks appear when it dries later. On the contrary, dry bamboo can be tougher and more brittle, so some craftsmen will soak the dry bamboo in water for a day before working on it.
For this tutorial, I used a dry bamboo harvested about 18 months earlier and I did not soak it.
Tools
- saw
- matchet or knife
- tape measure
- sandpaper
- pencil
- manual or electrical driller
- wood support to immobilize your bamboo when working on it
- safety gloves

Wear gloves for safety!
It is always a good idea to wear gloves if you are a beginner, at least one glove for the more vulnerable hand which is holding the bamboo when you use a tool.
Decide of the size of your future trivet
Here I propose a square trivet of 14 x 14 cm (about 5.5 x 5.5 in), with slats of about 2 cm wide (0.8 in).

Depending on your needs and the bamboo pole you have, you can adjust the size of this trivet. The slats which will make the trivet are from a single cylindrical portion of your pole. So, it is easier to choose a size that fits between two nodes to avoid the additional work of nodes scrapping and removal.
I also tried to make a smaller version of 6.5 x 6.5 cm (2.5 x 2.5 in). A bit too small as a hot pot holder, but ok for mugs!

Saw a cylinder of bamboo
First, you need to saw a node-free bamboo cylinder of 14 cm long (5.5 in), or your custom length.
Try to saw a clear cut perpendicular to the bamboo axis, as this will save you some correcting work later.

Split the cylinder in 6 flat slats
Use a tape measure and a pencil to mark the limits of the 2 cm wide slats (0.8 in) on your bamboo cylinder. You can also use a pattern that you will have prepared before, like on the picture.

Split the cylinder on the marks to create your raw slats. With a bamboo cylinder of 7-8 cm of diameter (3 in), you will obtain more slats than necessary. They may be additional ones in case one of them breaks in the building process, or they can be used to create dowels (see hereafter).
The last step is to correct the edges of the slats which we want to be 90° angles. The easiest way is to split again using your matchet or knife, and then sand using sandpaper (next step).

Sand the slats
Using sand paper, flatten the bottom side of the slats which is concave, the top side which is convexe, and the edges in case the splitting was not smooth enough. This will make your trivet more stable, and ease the process of drilling (next step).
If you want to simplify the process, you can skip the sanding of the top side. It will create a similar style as the one of our small trivet, a little more rustic.

Drill the slats
When drilling, there is always a chance of breaking a slat if we apply to much pressure. We can limit this risk by choosing a thin drill bit. Also, the chance of breaking is reduced when the bottom of the slat is flat. You can use a manual or electrical driller. Here I used a manual driller with a drill bit of 3 mm of diameter (0.12 in).

Start by piercing the slats forming the square frame  of the trivet. These slats are joined to one another with two dowels
  , instead of one, to make the structure more resistant by acting as a cross-bracing
 . Note that in our small version of the trivet, the structure was strong enough even with only one tight and wider dowel for each join.

Then you can pierce the holes for the two middle slats  . Or, if it is more convenient, you can first join the frame using dowels (next step), and later drill and join these remaining two middle slats.

Make the dowels
Use one of the remaining slats to create the dowels.
Using your matchet or knife, split the slat into sticks the diameter of the holes you drilled, that is, 3 mm in our case (0.12 in).

Dowels can be very slightly wider than the holes so that they will maintain the two slats well. For small dowels like here, or for precise work, it can be easier to use a small knife or a cutter to prepare the dowels, but with extra care to make sure not to cut your fingers!
Join the pieces together
Gently insert a dowel into a hole to join two pieces. You can use the blade of your matchet as a light hammer. If the dowel is not perfectly round or not wide enough, which is quite common, you can use some left over fibers to fill the gaps. On this picture I insert simultaneously one dowel and additional fibers.

When the dowel transpierces the 2 layers of slats, cut the surplus of the dowel using your saw, or another tool, such as shears or a cutter if it is handier. Then repeat the same process for all the joints one after the other.
Sand a last time
When all the slats are joined together, you may find that the tips of the slats are not exactly aligned, or that the tips of the dowels are slightly higher than the level of the slats. You can correct all these imperfections by sanding again the edges, the bottom, and the top of your trivet, using sandpaper.

And that’s it, your hot pot mat is ready to use!

Disclaimer
I am doing my best to share clear, useful, and quality research. However, I disclaim any liability regarding the way the content that I share may be interpreted or used, and regarding the consequences of its use.
Last update: Nov 19, 2020
Lénaïc Pardon
I am a kind of researcher-explorer. I am French, introverted, and hypersensitive. I value a lot freedom, creativity, and altruism. I am curious about almost anything, but I do have a preference for topics around simple living: permaculture, nature, craftsmanship, autonomy, philosophy, the mysteries of life… More about me and my work >